New clothes
The NSR came to me dressed like it had hurriedly jumped into the first thing it could find on the factory floor. The bike was supposed to be a Red white blue but had the forward fairing from a blue white red bike, a fiberglass mudguard and what bodywork it had was tatty.
The bike was in need of a respray which left me the tough choice of "which colour?".
After much procrastinating I chose to stick with the Blue white red. This would require the wheels to be powder coated white to match but as per the rest of the bike they were in need of something regardless.
Fairings
I had been offered a good price on a respray but it was on the condition the shop was quiet to do the work and this was very slow coming.
In the mean time I managed to get a full fairing set from xx-moto for just £350 sprayed in the factory blue white red. This wasn't something they originally offered but on describing what I wanted they were very helpful, sending photographs as things were completed.
I had some trepidation towards buying Chinese fairings but I had heard some good things and for the price, if all wan't as I had hoped, they would do for track days and the like.
Fast forward a month or so along with a fairly reasonable duty payment and I had my nice big battered box of fairings.
After much unwrapping I found all of these bits inside with a very nice paint job indeed. It is so much better looking than the factory plastic with stickers on. I hope whoever paints my original fairings does as good a job in the future!
Sadly the nose fairing had taken some damage in transit. It was clear from the seam on the inside that this fairing was repaired during manufacture and this had failed in transit. This was really disappointing as otherwise things looked pretty good otherwise.
I spoke to the seller and he went to work making a replacement for me. A bit of a delay but I was pleased this was going to be less hassle than it could have been.
I went ahead and started fitting the fairings hoping that the famous "poor Chinese fit" was just a myth.
I was using a nice stainless button fastener kit from eBay with a few titanum fasteners thrown in where the kit was wanting a little.
The tail unit went together without too much fuss. The fit is really nice with everything lining up as it should. Good start!

Addition of neat Tyga performance carbon bit just adds to the exotic looks of this bike without cheapening it one dot.
The right side panel uses Dzus fasteners which need riveting on.
The locations are marked but not drilled in some cases and drilled already in others. It's not a big deal to do though so don't panic!
Pop rivet guns are cheap and a Dzus fastener screw (of the correct grip length) and nut plate can be found for good money so lets do this properly.
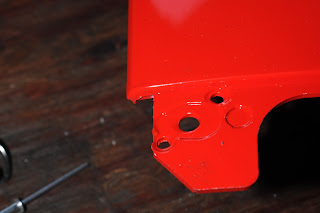
First holes were drilled for the rivets and screw noting the sizes they needed to be. This one was drilled already hence why the paint can be seen in the holes.
Rivets of the correct grip length are loaded into the rivet gun mandrill first. The rivet body is inserted into the hole with he nut plate held in place behind. so its domed head sits flat on the surface then the rivet gun is carefully squeezed so as not to twist. Continue the squeeze till the mandrill breaks and the rivet is formed. As the mandrill beaks it is easy to scratch the crap out of your work so be careful and maybe practice once or twice before doing the fairing.
A fully fitted nut plate ready to fix some fairings!
I'd mention here that I would not suggest using D ring Dzus screws. They fowl the fairing in most cases which is a shame as they look very racy.
Allen key ones look smart and cost no more.

The belly pan clips together with a nut, bolt, washer setup inside that box section bit at the front to hold things together. You can also drill and tie wrap round the clips to help things out should your clips break.
The clips are going to be fragile (the plastics cheap remember) so take care here.

With everything together there should be a sheet of reflective foam that could easily be mistaken for additional packing material in the box.
Chop it in half and stick in where the exhausts go to prevent damage from heat to the fairings.

Then on goes the front V piece to help make the shape of the fairing. Much easier to do it now rather than later believe me!
With that in the belly pan and left fairing are done ready to fit.
Below are some close up details of this section.


By now the nose fairing had arrived which was thankfully damage free.
It was however screw thread and head lamp adjustment free too.
I tapped the plastic to take some bolts (this will clearly last forever...) and cut a sheet of aluminium to make the headlamp adjuster.
This was then chamfered at the upper corners for a closer fit.
Next up a hole was drilled and nut plate added to allow a long screw with a spring held between two washer to be inserted. This would act as a headlamp aim adjuster pivot point.
Once that was all done a large cut out was made to allow the front fairings main center screw to be fitted.

Another angle of the assembly. how the top of the headlamp will pivot from here as the bottom of the headlamp is pushed and pulled to the desired position.
The cheap fairings were okay. It would have been nice to have had the original nose fairing as it was a lot better than the rushed replacement. As "luck" would have it an accident would break this fairings screen stay under the mirror so the original was repaired and fitted. I'd say these do the job okay. They are far from the quality of the Japanese originals but also far from the price. Lets not forget that paint as well. It does look nice.


Comments
Post a Comment