Black bits black and some of their friends
The headstock was looking tatty and the mirror stems on my VFR were beginning to flake so seeing as the tape was still on the line from repainting the subframes I decided to do the same for black bits.
I had already gone round the bike with a tin of Hammarite recoating some of the fairing brackets and the bar ends so there wasn't allot of bits that needed doing.
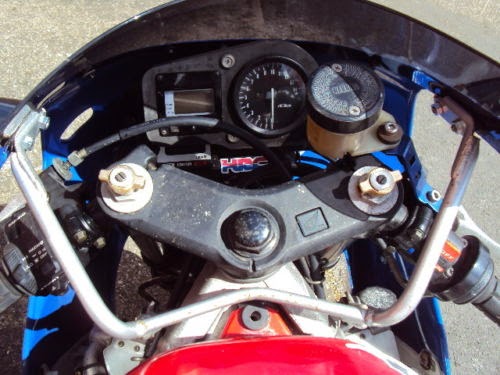
I removed the preload adjusters, headstock nut and head stock then looked around for more bits to paint.
The bottom bracket of the headstock could have done with a paint but at the time I didn't have anything suitable to use as a stand so I could drop the front end off. This could wait for another day perhaps.
The brake reservoir cap is also metal so that came off and then my attention turned to the brake resevoir bracket. For some reason the previous owner had put a blue anodised after market bracket o this bike. These are far from expensive to replace but i knew the original was black so for the time being I detached this blue monstrosity to make it look less silly.
that was about it so I went about hanging up the big bits then went over to the VFR and removed its mirror stems.
Without allot to paint I placed the headstock nut on some tissue with the reservoir cap. I knew I would probably replace it with a new one soon but painting it now wouldn't hurt.
I took a look at the preload adjusters. They looked pretty nasty in their faded gold anodized finish and the allan screws were heavily corroded (I was surprised they even undid). I first chose to bin them and buy a new set, then I decided to try spraying them black as I had nothing much to loose. I rubbed them down to remove any corrosion and scratches. I started with the tops using some course wet & dry. Looking at the contrast of the brushed aluminium against the anodized metal, I liked it, reminding me of an 80's digital watch face. I used a dremel with a drum type sanding bit to rub down the more fiddly sides and hung them up on the line with wirelocking.
I decided that the Headstock was better left unlacquered as it would look a bit strange shiny so snipped the wirelocking and placed it on the bike loose.
 Rattling the lacquer tin I looked over the remaining parts. All looked pretty good but I still wasn't convinced by the preload adjusters. Remembering the brushed look I had got whilst sanding these down I grabbed one off of the line and ran it along some wet & dry on my work bench.
Flipping it over it looked great with soft diagonal lines cut across its face catching the light. I hung it back up and did the same to the other one being careful to sand it in the same direction.
Now it was simple case of lacquering all of the parts
in the same way I had with the subframes. Boxing each part off into four sides and moving along the
In between coats I went at polishing the fork tops. Removing the aluminium oxide powder with the finer grades of wet & dry, before buffing them up with brasso. For once there was some actual brass to polish in the rebound screw that came up really nicely as you would expect.In my haste to polish I hadn't let the headstock dry for long enough and that suffered a little paint removal by the brasso. Another case of to much enthusiasm!
I quickly retouched this area leaving a slight swirl where the can had been to close whilst spraying. This can be seen on the left of the right fork top. Not the end of the world but I know it's there so will no doubt need doing again.
With everything dried off I bolted everything back together. The brake reservoir cap came up really nice and the headstock looks 100X better than it did but the show was totally stolen by the preload adjusters. Looking far better than I could have hoped for I am very pleased I chose not to throw them away.
In fact all of the parts came up so well I probably wont replace any of them. I had planned to get a Tyga headstock as they are cheap and look fantastic but I also really like these sand cast headstocks with the little winged insert. I think even that brake reservoir bracket may get to stay now it looks less daft.


Comments
Post a Comment